How AssetTracker works
AssetTracker builds on Hyperview’s capabilities by adding specialized hardware and software to achieve automated Rack U-level tracking across one or more data centers.
Terminology
Gateway, this is the device that handles communication between the hardware and the data collector.
Expansion Hub, this is a connection hub for the various components and the Gateway.
Master Module, this is the main module in a rack assembly
Extension Module, this is an extension connected to the Master Module or another Extension Module.
Asset Tag, this is the magnetic RFID that connects the asset to the AssetTracker Strip.
AssetTracker Strip, this is the combination of a Master and Extension Modules installed in an equipment rack and connected to a Gateway.
Software
The Data Collector’s AssetTracker component consists of two components:
MQTT Broker listening on port 1883/TCP. This component handles incoming communication from the asset tracking hardware.
MQTT Message Service. This component handles the communication with the Hyperview API.
These components are configured during the installation process. The installation process creates a random password to access the MQTT broker. You can reveal this password by running the show_mqtt_broker_credentials.sh script from the /opt/datacollector/bin/ directory. Please take care to keep this password private.
Tip
Always ensure that you are running the latest version of the data collector software.
Hardware
Master Modules are powered by an AssetTracker Gateway. Gateways, depending on the model, are powered by a POE power source or an AC power source. Gateways are configured to communicate with a dedicated Data Collector which in turn communicates with Hyperview.
Master Modules are 6 RUs long and can be expanded using Extension Modules. Each module has a unique serial number/ID and an address.
Extension Modules come in 5U or 6U length options. Use a combination of the 5U and 6U modules to fit exactly, or as close as possible, to the rack height.
The serial number is associated with the rack and the address is used when daisy chaining multiple modules to the same Gateway. Each daisy chain must have unique Master Module addresses.
Important
Only the V5008 AIoT Gateway allows for daisy chaining.
Tracking assets
Asset Tags are connected to assets in the rack and magnetically connected to the AssetTracker Strip. Each Asset Tag has its unique ID. You can scan Asset Tags using a compatible barcode or QR code scanner to input AssetTracker ID values directly in Hyperview.
Users can specify Master Module IDs (for racks) and Asset Tag IDs (for racked devices) while creating or updating relevant assets.
Detected AssetTracker Master Modules appear on the AssetTracker page (Assets → AssetTracker). Tagged assets can be reviewed from the parent rack’s Asset Audit page (rack → Information → Asset Audit).
Once installed and configured, AssetTracker automatically handles asset moves. Assuming there are no collisions if you physically move a tagged device, the corresponding asset in Hyperview will get moved to the new position during the next monitoring cycle. Asset move events appear in the rack and asset Change Log pages. If the asset does not get moved, proceed to the AssetTracker page (Assets → AssetTracker) to review and address any relevant issues.
Adding modules
Important
You must contact our support team to get access to the latest vendor configuration software and documentation.
Create or update a rack in Hyperview to correspond to the physical rack that will be tracked.
You can provide the Master Module ID (the serial number of the physical Master Module) while creating the rack.
If the rack already exists, you can update its properties (rack → Information → Properties) to include the Master Module ID.
The module will appear on the AssetTracker page (Assets → AssetTracker) within a few minutes. Proceed to add Asset Tags.
Aligning RUs
Depending on your set-up you may need to explicitly configure rack units. For example, your AssetTracker Strip could be smaller than the physical rack, or you might want the RU count to go up to 52U instead of 42U.
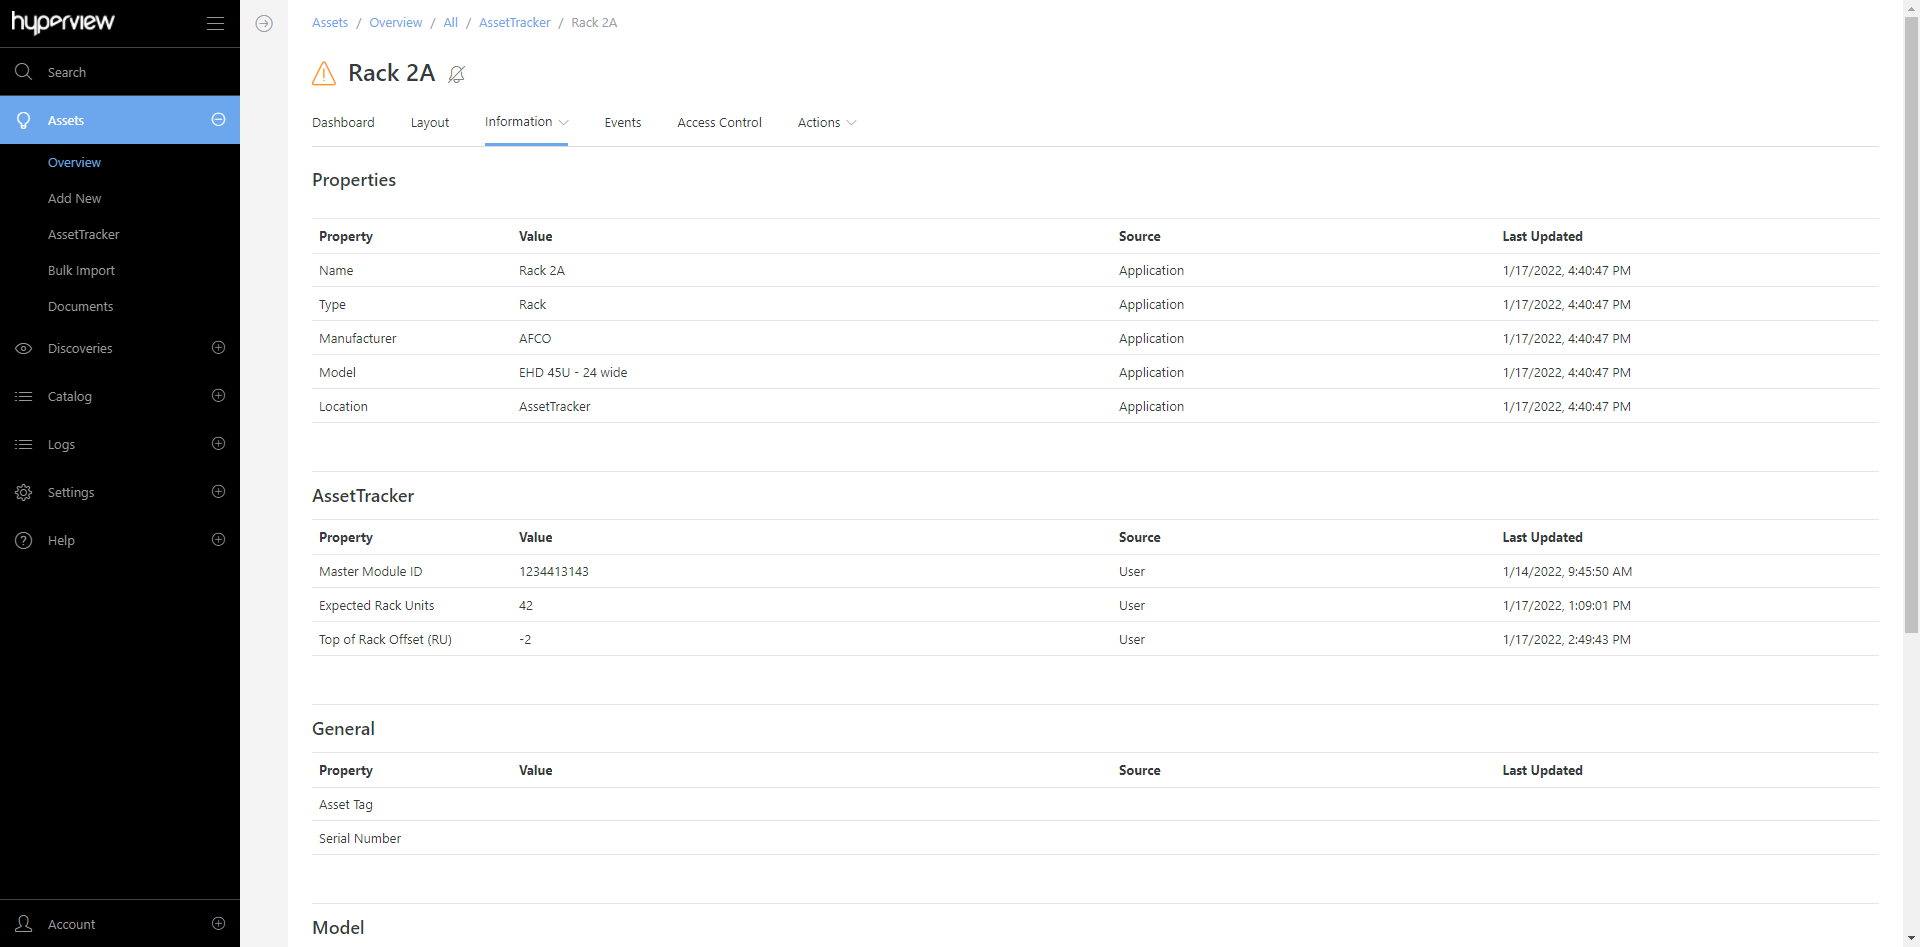
To align RUs, open the Properties page (rack → Information → Properties) and provide values as needed.
The Expected Rack Units value should match the RU length of the AssetTracker assembly.
The Top of Rack Offset (RU) value should match the number of RUs you want to offset the top of the rack by. This can be a positive or negative value depending on whether the top of the AssetTracker assembly is below or above the top of the physical asset.
For instance, if the rack has 44 RUs but the AssetTracker Strip is only 42U, set Expected Rack Units to 42. If the AssetTracker Strip is installed from the top of the rack as suggested, leave Top of Rack Offset (RU) blank or set to 0. Alternatively, if the assembly is installed from the bottom of the rack, set Top of Rack Offset (RU) to 2.
Adding and auditing Asset Tags
Create or update an asset in Hyperview that corresponds to a device in the target rack.
You can provide the AssetTracker ID (the serial number of the intended Asset Tag) while creating the asset. Note that the Asset Tag can be quickly scanned using a compatible barcode or QR code scanner to populate this value.
If the asset already exists, you can update its properties (asset → Information → Properties) to include the AssetTracker ID, or use the Asset Audit page (asset → Information → Asset Audit) to update the AssetTracker ID value.
Place the adhesive part of the Asset Tag onto the device. Ensure the tag is secure.
Place the tag itself on the rack’s AssetTracker module. You must place the tag on the topmost U-location occupied by the asset being tagged.
For example, if you are tagging a 4-U device placed between locations 20 and 23, place the tag on location 23.
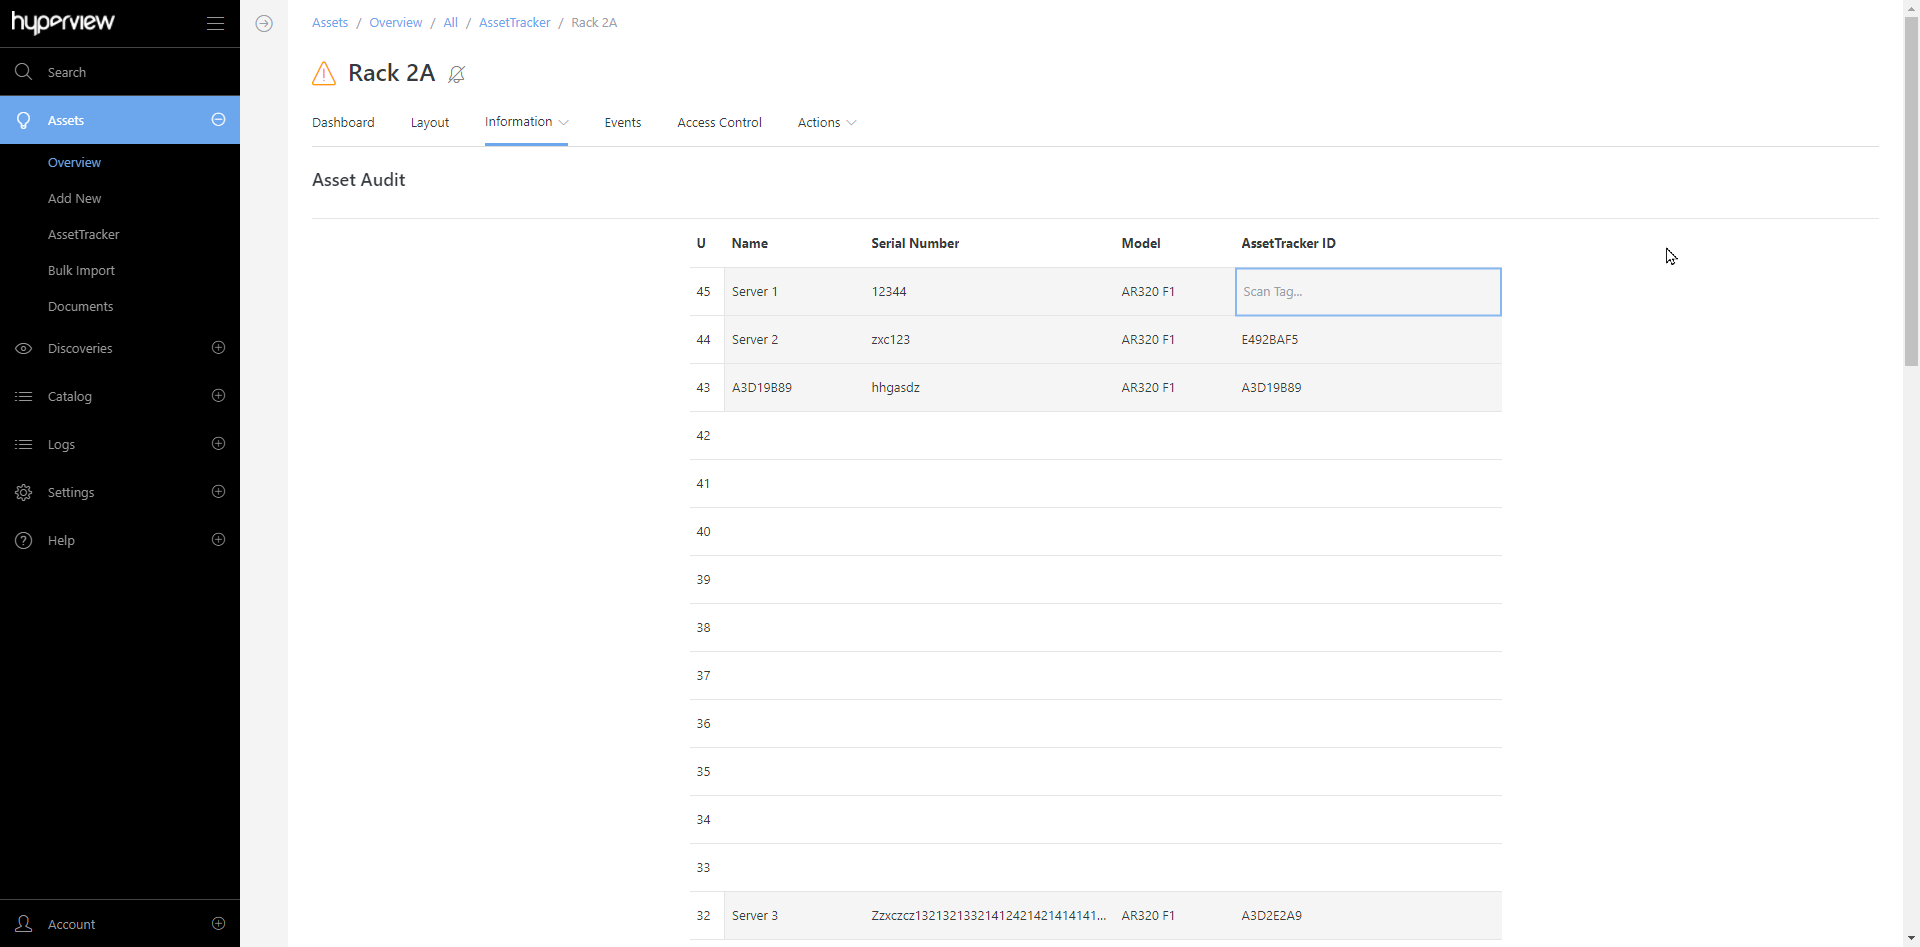
Assuming there are no placement collisions or errors, the asset will be moved to the correct rack U in the Rack Elevation within a few minutes. It will also be shown on the Asset Audit page for the rack (rack → Information → Asset Audit). Proceed to add more Asset Tags for other racked devices. Please contact Hyperview Support if you need to attach Extension Modules.
Tip
You can use the Expected Rack Units and Top of Rack Offset (RU) fields on the rack’s Properties page (rack → Information → Properties) to fine-tune your setup or accommodate additional assembly configurations and rack sizes, as needed. Please attach Master Modules and Extension Modules accordingly.
Deleting modules
Detach the AssetTracker Strip from the Gateway. If it is part of a daisy chain, take care to reconnect things appropriately to maintain power and communication.
Open the AssetTracker page (Assets → AssetTracker) and select the corresponding module.
Click Delete → Delete.
Clear the Master Module ID property from the applicable rack.
Repeat the steps for additional modules that you want to retire or remove as needed.
Collisions and warnings
Under certain circumstances AssetTracker will fail to move an asset into the intended rack U. This could be due to:
The Asset Tag is placed in the wrong slot on the AssetTracker module or the wrong module.
The model information for the incoming asset, the existing asset, or both is incorrect.
An untagged asset already exists in the target position.
These kinds of placement conflicts are referred to as “collisions”. Hyperview issues a warning whenever it encounters collisions (and/or other issues) so that you can take the appropriate corrective action.
Possible warnings
Unknown Module: Issued for the All location when AssetTracker detects a module that is not associated with a rack.
Unknown Tag: Issued at the rack level when a detected Asset Tag is not associated with a Hyperview asset.
Collision: Issued at the rack level when a detected tagged asset collides with another asset in the same position.
Heartbeat Stopped: Issued at the rack level when a module has not reported its status for more than 30 minutes.
Module and Rack Size Mismatch: Issued at the rack level when a module reports a size that does not match the rack it is associated with in Hyperview.
Viewing AssetTracker events
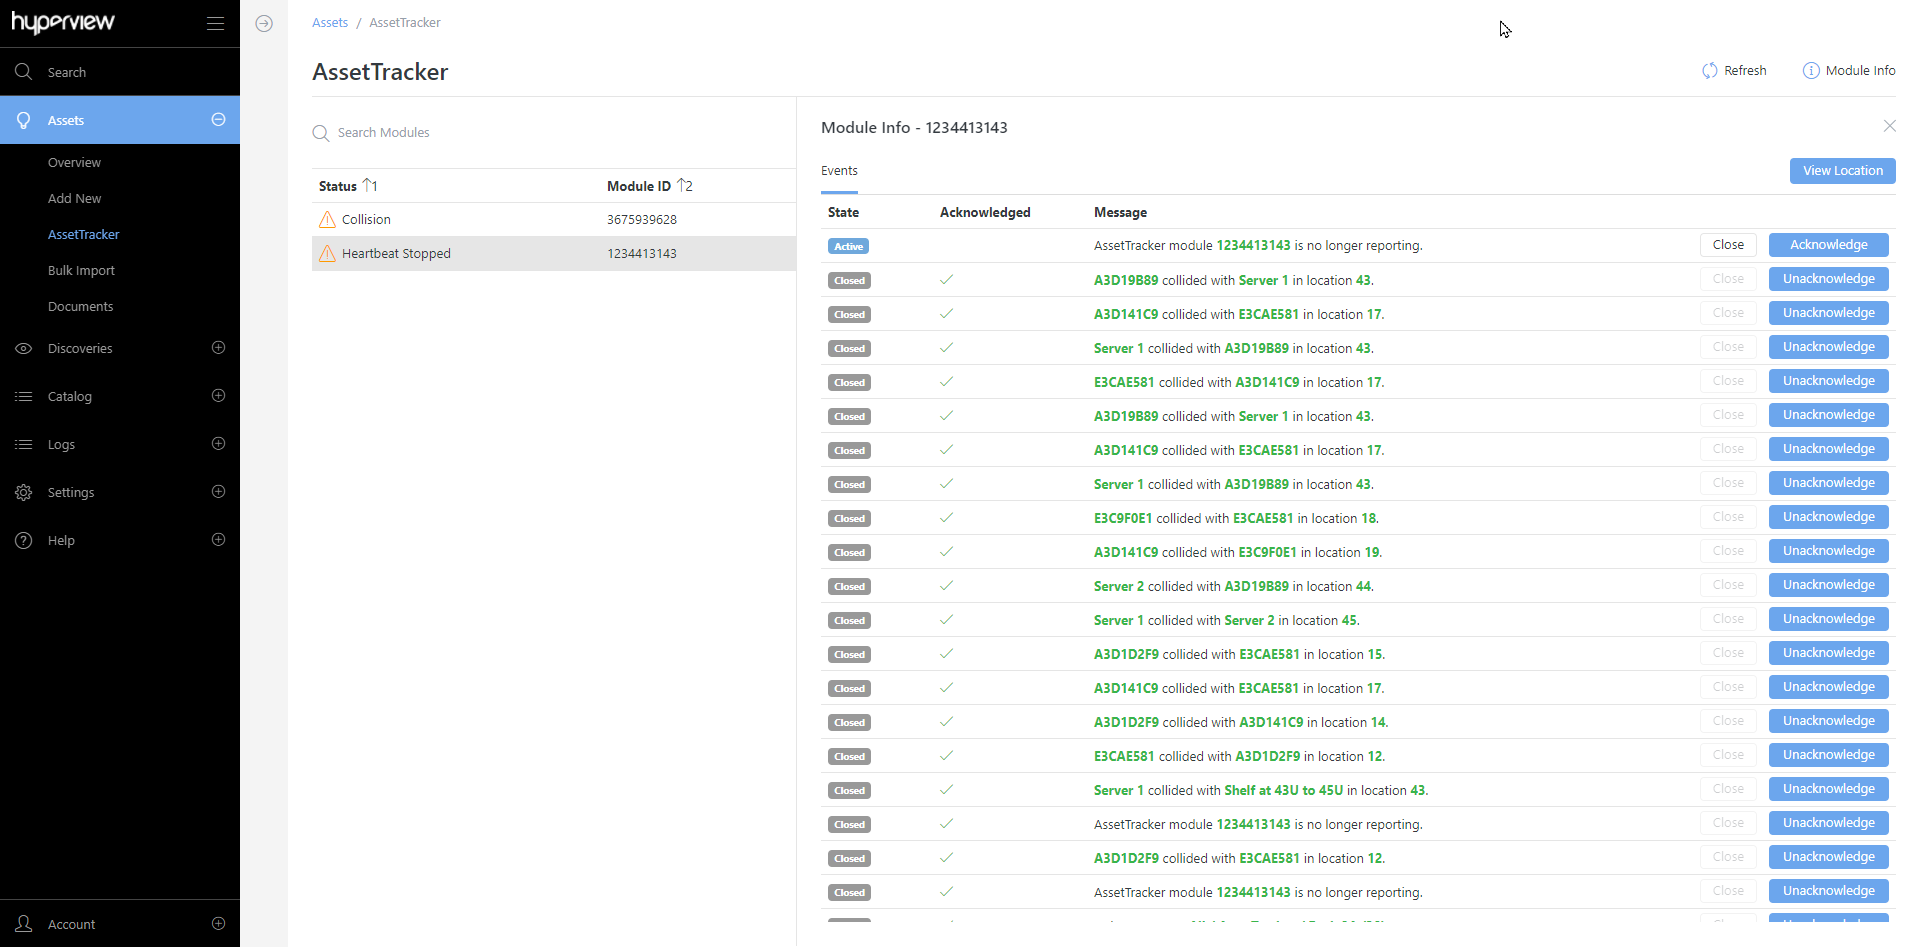
Open the AssetTracker page (Assets → AssetTracker).
Select the intended module → Module Info.
Proceed to acknowledge or close event messages as appropriate. You can also navigate to the module’s location using the View Location button.
Partial deployment
The following table describes placement outcomes for an AssetTracker-licensed data center that has both tracked and untracked racks.
Scenario |
Outcome |
|---|---|
Asset Tag is accidentally or intentionally removed |
The asset is moved to the current rack’s Unplaced grid |
Tagged asset is moved within a tracked rack |
The asset’s RU is automatically updated in Hyperview |
Tagged asset is moved to another tracked rack |
The asset’s rack and RU is automatically updated in Hyperview |
Tagged asset is moved to an untracked rack |
The asset is moved to the original rack’s Unplaced grid, RU values must be updated manually |
Untagged asset is moved to a tracked rack |
Undetected, RU values must be updated manually |
Untagged asset is moved to an untracked rack |
Undetected, RU values must be updated manually |
Known limitations
AssetTracker has the following known limitations. We aim to address some of these in future releases.
AssetTracker can only place assets in the front of the rack.
Tagged zero U assets can be tracked to the specific rack, but not at the Rack Elevation level.
Shelved assets are not supported. AssetTracker will attempt to move tagged shelved assets to a non-shelf position in the Rack Elevation, or un-place them in the rack.
Side-by-side asset positions are currently not supported.
Tested barcode scanners
The following barcode scanners have been tested with AssetTracker. However, other scanners should work as well provided they are properly configured; please refer to your scanner’s documentation.
The scanner must be connected to a device running Hyperview on a supported web browser to be able to input AssetTracker IDs.
NETUM NT-1228BL. You must configure the device by scanning the Terminator barcode (3030052 CR).
KOAMTAC KDC300. The specific model we tested is KDC300iM-SR.