Document Management
Hyperview Document Management is a separately licensed set of features that let you create and maintain asset-document associations. For example, you can associate device or model-specific documentation, license agreements, maintenance schedules, MIB files, troubleshooting notes, and so on.
Note
Only licensed instances will have relevant features. To confirm if you have a Document Management license, check the License page (Settings → License, Administrator-only).
Supported file types
A “document” can be a file or a URL. The following file types are supported:
Category |
Supported file types |
|---|---|
Document format |
.doc, .docx, .odt, .pdf, .rtf, .txt |
Image |
.bmp, .dib, .gif, .ico, .jfi, .jfif, jif, .jpe, .jpeg, .jpg, .png, .svg, .tif, .tiff |
List/Spreadsheet |
.csv, .ods, .xls, .xlsx |
Presentation |
.odp, .pps, .ppsx, .ppt, .pptx |
Visio |
.vsd, .vss, .vst, .vdx, .vsx, .vtx, .vsdx, .vssx, .vstx, .vsdm, .vssm, .vstm, .vsw, .vsl |
Other |
.mib, .xml, .zip |
Note
The maximum upload size is 10 MB. The default total document storage size is 5 GB.
Accessing documents
All users can access documents, provided they have access privileges (except for Administrators, who have system-wide unrestricted access). You can search for documents, download document files, and view document links.

Searching for documents
You can search for documents from:
The Documents grid (Assets → Documents)
An asset’s Documents grid (browse to asset → Information → Documents)
Simply search for the document using the Search Documents row at the top of the grid.
Downloading document files
To download a document file, click on the corresponding Download button in the Documents or asset’s Documents grid. The file will be downloaded to your browser’s default download location.
Power Users and above can also download documents while viewing or updating details.
Viewing document links
To view a document link, click on the corresponding View Link button in the Documents or asset’s Documents grid. The link will open in a separate tab in your browser.
Power Users and above can also view links while viewing or updating document details.
Adding new documents
You must be a Power User, Data Center Manager, or Administrator to be able to add a document. If you are adding documents from Information → Documents and are a Data Center Manager or Power User, you must also have access to the underlying asset.
You can add a new document from the Documents grid for all assets (Assets → Documents) or an asset’s Documents grid (Information → Documents). The steps are similar, but the outcome is slightly different:
Adding a document from Assets → Documents will add the document.
Adding a document from Information → Documents will add the document, as well as create the asset-document association.
Adding a document from Assets → Documents
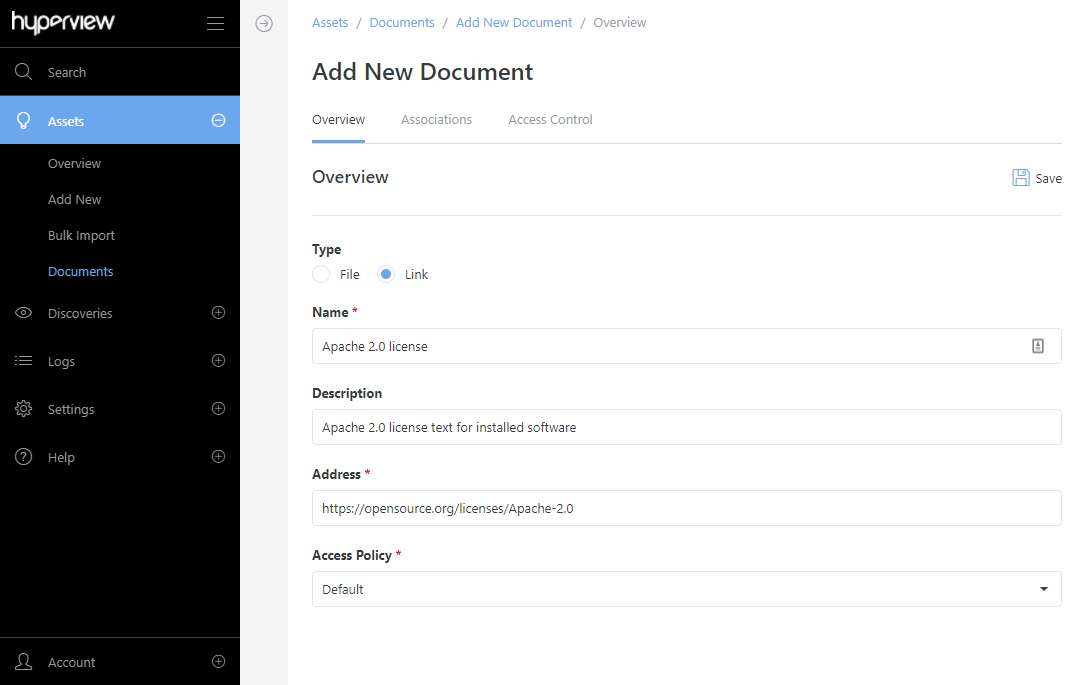
Go to Assets → Documents → Add.
Enter details as follows:
Specify the Type (File or Link).
Provide a name for the document.
Provide a brief description.
Select or drag-and-drop the file (if uploading a file; see Adding new documents), or enter the full URL, including the protocol (if adding a link).
Select an existing Access Policy from the dropdown (note: Power Users and Data Center Managers can only view and select access policies that they are a member of).
Click Save. A success message will appear.
Proceed to add associations (see Managing document associations).
Adding a document from Information → Documents
Browse to the intended asset → Information → Documents → Add.
Enter details under New Document as follows:
Specify the Type (File or Link).
Provide a name for the document.
Provide a brief description.
Select or drag-and-drop the file (if uploading a file; see Adding new documents), or enter the full URL, including the protocol (if adding a link).
Select an Access Policy from the dropdown, or leave the asset defaults (note: Power Users and Data Center Managers can only view and select access policies that they are a member of).
Click Save. A success message will appear.
Managing document associations
You must be a Power User, Data Center Manager, or Administrator to be able to manage document associations. If you intend to add or remove document associations from Information → Documents and are a Data Center Manager or Power User, you must also have access to the underlying asset.
Adding document associations
Go to Assets → Documents → Edit → Associations.
Click the Add button → select the intended asset from the dropdown → Add.
Repeat step 2 to add more associations, as needed.
Tip
The Associations tab is also available upon adding a new document from Assets → Documents.
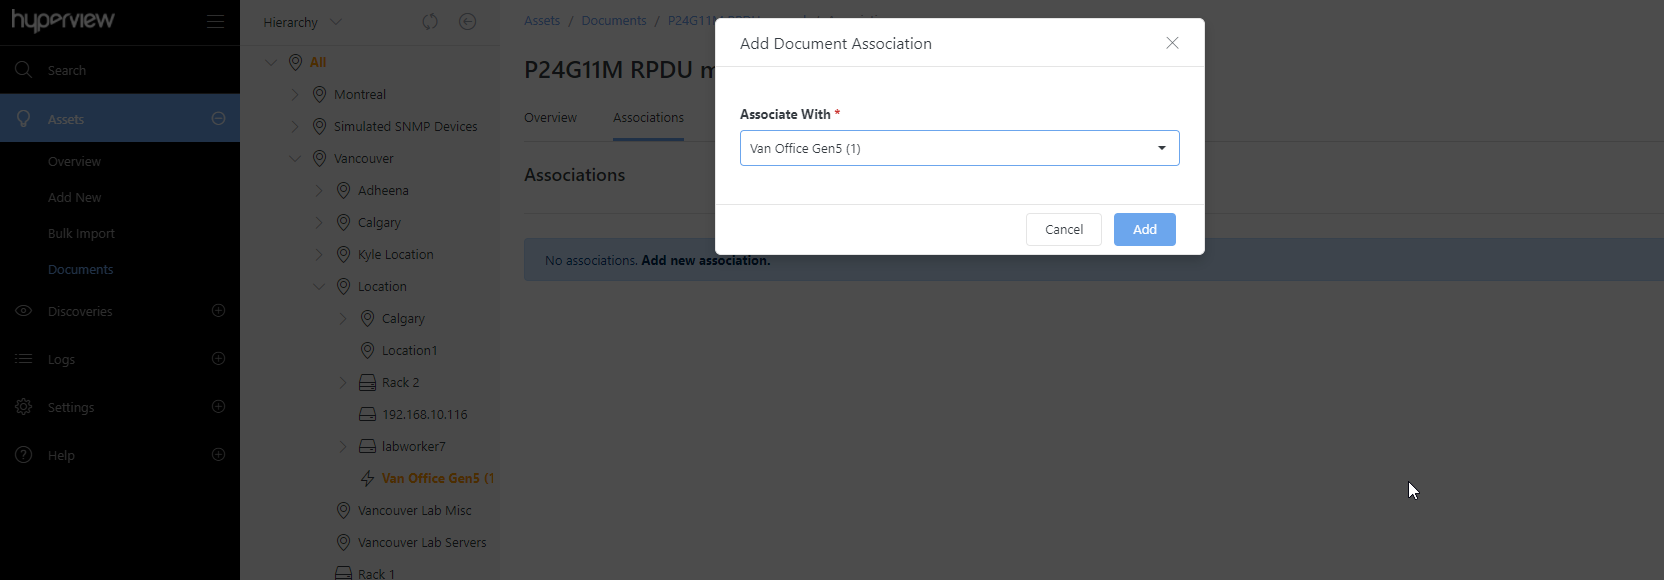
Alternatively, to add document associations per asset:
Browse to the asset that you want the intended document to be associated with.
Go to Information → Documents → Add → Existing Document.
Select the document from the dropdown, and click Add.
Repeat the process for additional associations, as needed.
Removing document associations
Go to Assets → Documents → Edit → Associations.
Click the Remove button for the relevant asset.
Repeat step 2 to remove more associations, as needed.
Alternatively, to remove document associations per asset:
Browse to the associated asset → Information → Documents.
Click the Remove button for the relevant document.
Repeat step 2 to remove more associations, as needed.
Adding or removing document associations in bulk
You can bulk-add or bulk-remove document associations while accessing assets from an Assets By Type, Assets By Location, or Advanced Search grid. The steps are identical for all three grids.
Browse to the Assets By Type or Assets By Location grid, or perform an Advanced Search to find the intended assets. For example, to view all Virtual Servers, open Assets → Asset Types → Virtual Server.
Select the assets that you want to associate with a certain document.
Click Bulk Actions → Add Document Association to add associations, or Bulk Actions → Remove Document Association to remove them. A corresponding modal will open.
Select the checkbox if you want to receive an email notification when the bulk job is completed.
Select the document from the dropdown, and click Add (if you are adding associations) or Remove (if you are removing them).
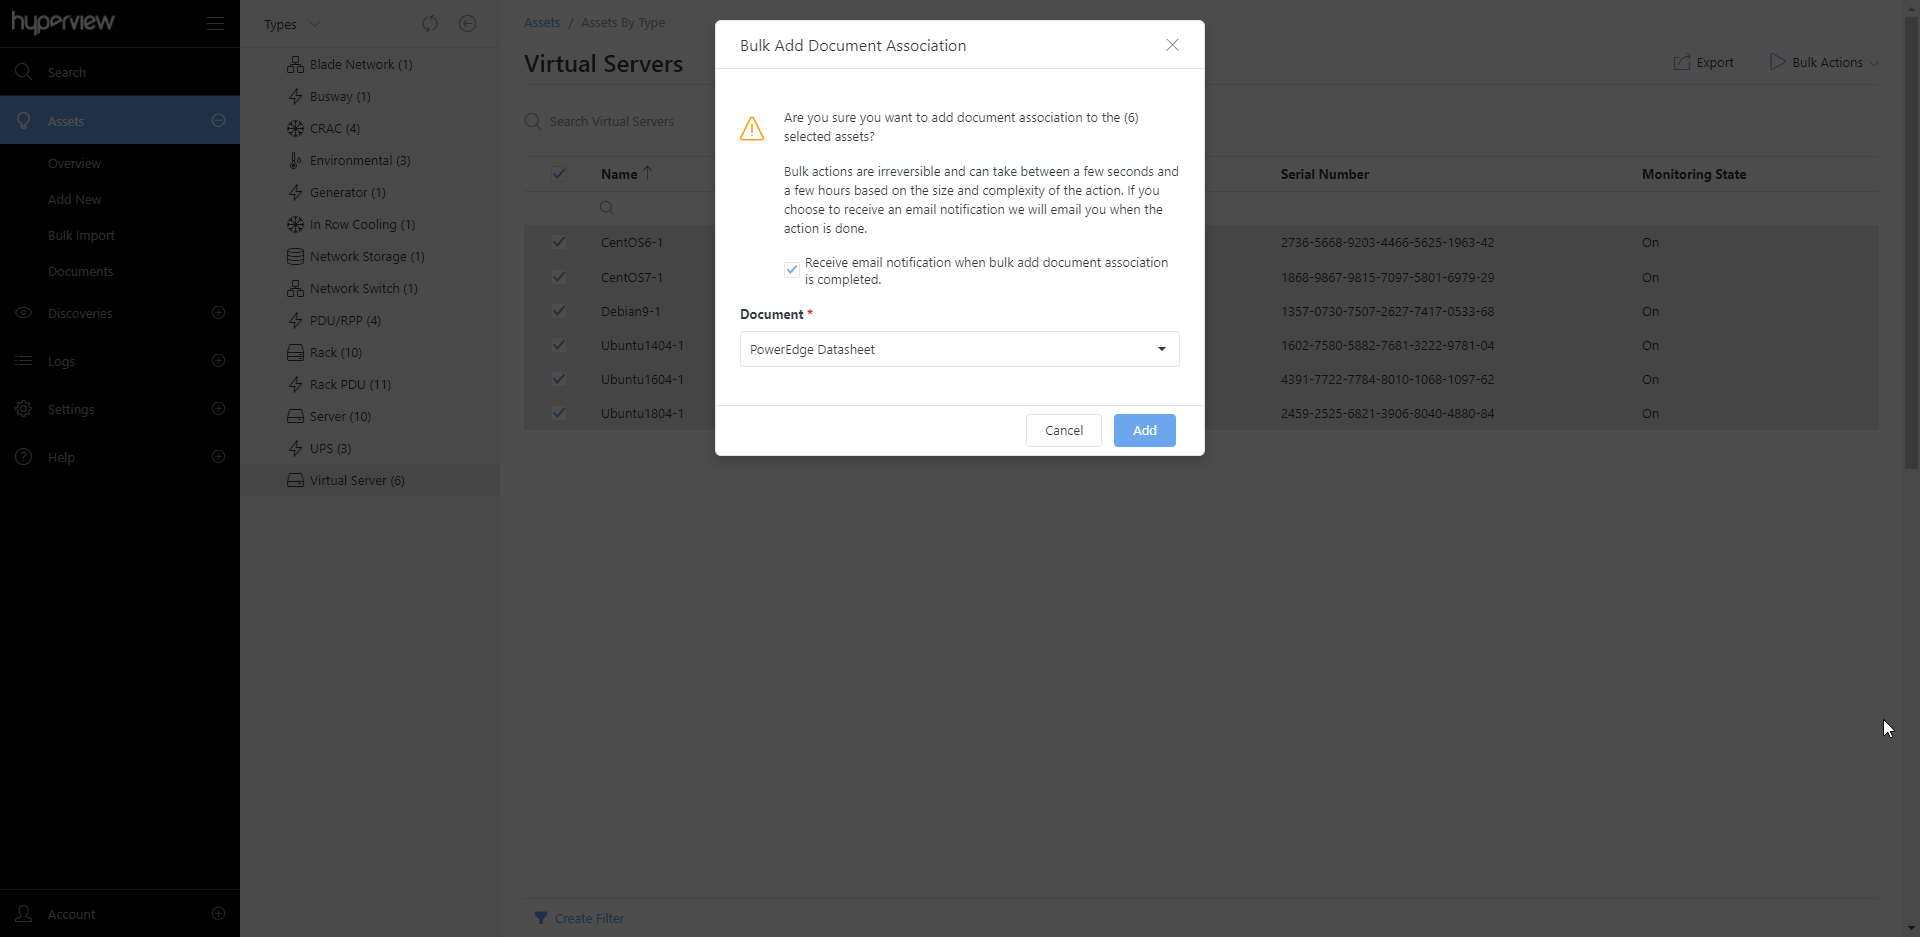
A success message will appear confirming that the bulk job has been initiated.
Updating document details
You must be a Power User, Data Center Manager, or Administrator to be able to update a document’s details (the information that is displayed in the document’s Overview page, and in the grid).
Go to Assets → Documents → Edit.
Update details under Overview as needed:
Update the document name.
Update the description.
Replace the file (see Adding new documents) or update the URL (remember to include the protocol), depending on whether the document is a file or a link.
Click Save. A success message will appear.
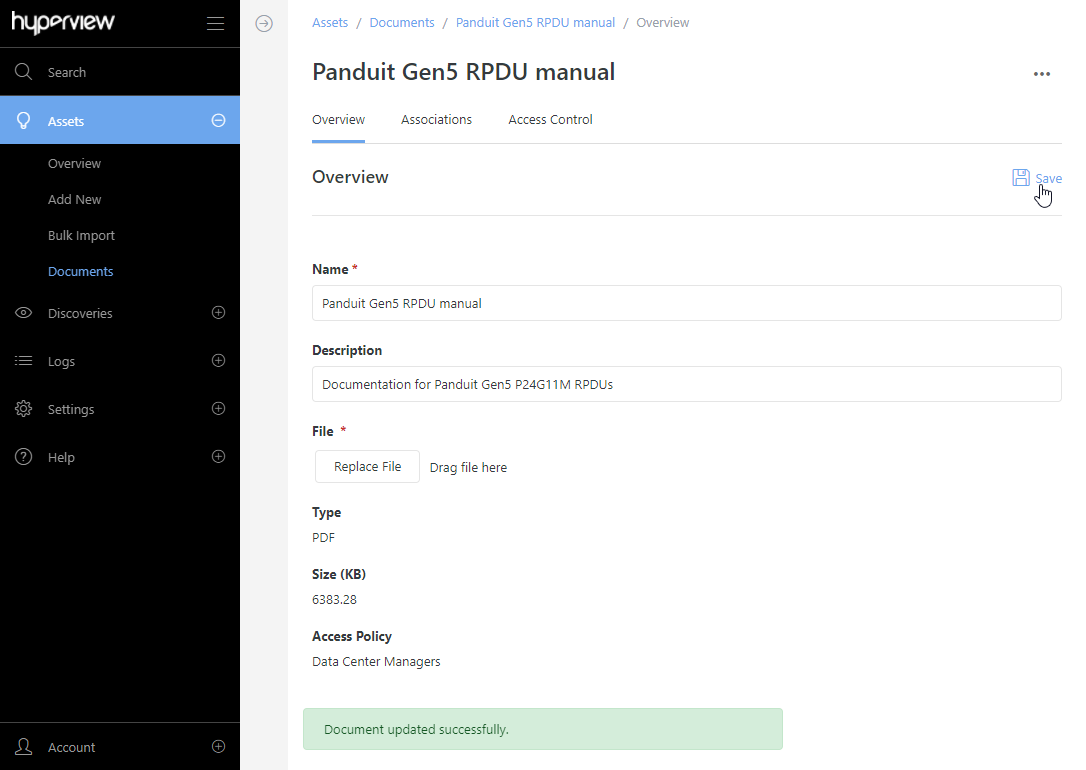
To update the access policy, proceed to the Access Control tab (see Updating a document’s access policy). To modify document associations, go to the Associations tab (see Managing document associations).
Updating a document’s access policy
Access policies determine who can access a certain securable object, such as a document. You must be a Power User, Data Center Manager, or Administrator to be able to update a document’s access policy. Furthermore, Power Users and Data Center Managers can only view and select access policies that they are a member of.
To update a document’s access policy:
Go to Assets → Documents → Edit → Access Control.
Select the intended access policy from the dropdown → Save.
Click Save to confirm. A success message will appear.
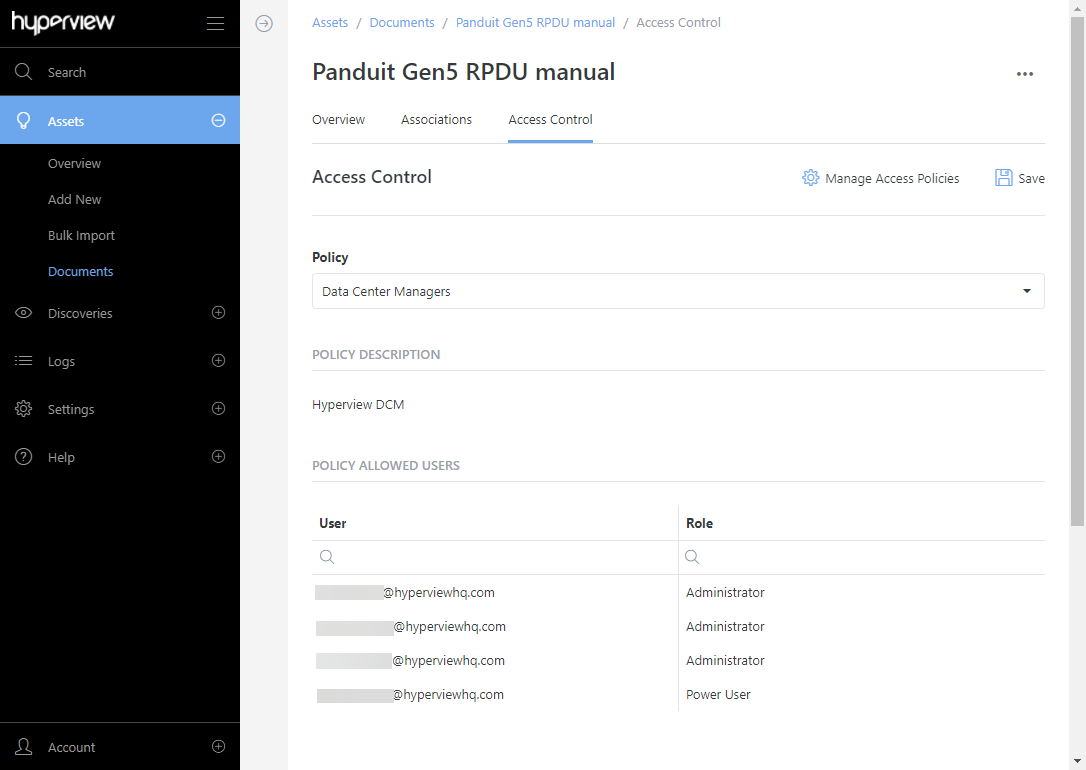
Administrators can manage access policies using (Access Control → Manage Access Policies). Refer to Managing access policies for instructions.
Deleting documents
You must be a Data Center Manager or Administrator to be able to delete documents.
Browse to Assets → Documents.
Click the ellipsis (three dots) for the target document → Delete.
Click Delete to confirm. A success message will appear.