Setting up Data Collectors
The Hyperview Data Collector collects and relays data back to the Hyperview platform. It covers the following functional areas: discovery, monitoring, control operations (for example, setting control credentials), RFID asset tracking, and trap listening.
You must register a Data Collector before it can relay information. You can only trigger the registration from the machine that hosts the Data Collector, and the process requires a unique, limited time, single use Registration Token for that particular Data Collector.
Once registered, the Data Collector saves the access credentials in a local configuration file. It then polls the Hyperview platform for data collection jobs.
The Data Collector must initiate all communication between the Data Collector and Hyperview. All communication is encrypted using TLS.
Prerequisites
You must install the Hyperview Data Collector on at least one machine (physical or virtual, running a supported operating system) with network access to your devices.
You cannot install multiple instances of the Data Collector on the same device or register the same device with more than one Hyperview instance.
Data Collectors must have unique names. If you are planning to use the Data Collector with AssetTracker (RFID asset tracking solution), or as an SNMP trap aggregator, its IP address must remain static.
Minimum Hardware Requirements (AMD64/X86_64/RPI ARM64)
4 CPU cores
8 GB of RAM
64 GB of free space in the /opt partition or where the /opt directory resides
Tip
If you plan to use a Raspberry Pi for data collection, the minimum hardware requirements are a Raspberry Pi4b 8GB model and a physical SSD or NVMe for storage.
Supported Linux Distributions
The following distributions are tested to run the Hyperview Data Collector.
Red Hat Enterprise Linux 8 & 9
CentOS 9
Rocky Linux 9
Alma Linux 9
Ubuntu Server LTS 22.04 & 24.04
Debian 11, 12 & 13
openSUSE Leap 15 & 16
Important
Please ensure that the Podman container management software is not installed.
Please ensure that the snap version of Docker is not installed.
Let us know if you would like us to support more Linux distributions. Contact Support.
Software Dependencies
Depending on the Linux distribution used, please use apt, dnf, or zypper to install the following packages
Command |
Deb/APT Package |
RPM/Dnf/Zypper Package |
|---|---|---|
awk |
gawk or mawk |
gawk |
cut |
coreutils |
coreutils |
docker |
docker-ce and docker-compose-plugin |
docker-ce and docker-compose-plugin |
grep |
grep |
grep |
host |
bind9-host |
bind-utils |
jq |
jq |
jq |
libicu |
libicu72, libicu74 or libicu76 depending on OS |
libicu, libicu65, or libicu77 depending on OS |
sed |
sed |
sed |
tar |
tar |
tar |
uuidgen |
uuid-runtime |
util-linux |
wget |
wget |
wget |
whiptail |
whiptail |
newt |
Note
Docker Inc. provides detailed installation documentation.
openSUSE and SUSE Linux Enterprise Server. Please use the OS vendor provided Docker Open Source Engine and Docker Compose Packages.
Please use the RHEL Docker CE installation instructions for Rocky Linux.
Please use the CentOS Docker CE installation instructions for Alma Linux.
The
jqpackage may not be available from the official RedHat repository for RedHat Enterprise Linux or derivatives. If that is the case, the Extra Packages for Enterprise Linux EPEL project will have it.
Network requirements
Data Collector to Hyperview
The Data Collector uses HTTPS/TLS (TCP/443) to communicate with Hyperview. The direction is outbound from the Data Collector to Hyperview.
The data collector software needs to communicate with the following hosts:
Instance URL: https://INSTANCE_NAME.hyperviewhq.com/
Download repository: https://hvstorewestus2.blob.core.windows.net/datacollectors
Container repository API: https://hvpublic.azurecr.io
Container repository data endpoint: https://hvpublic.westus2.data.azurecr.io
Please make sure these are in communication allow lists if applicable or required by your network security policy.
Data Collector to assets
Please ensure the Data Collector can reach the targeted assets on the applicable ports for your site. Below is a list of the default ports the Data Collector will use; other ports can be used if needed.
Protocol |
Port |
Credential Requirements |
|---|---|---|
SNMP |
161 (gets, sets) |
Community string or SNMPv3 credentials |
Modbus/TCP |
502 |
Not required |
BACnet IP |
47808 |
Not required |
ICMP Ping |
N/A |
Not required |
IPMI |
623 |
Username & Password |
SSH |
22 |
Username & Password or Username & Key |
WMI |
135 |
Username & Password |
VMware |
443 |
Username & Password |
IxOS |
443 |
Username & Password |
Firmware Update |
443 or 80 |
Username & Password |
Assets to Data Collector
Please ensure the asset can reach the targeted Data Collector on the applicable ports for your site. Below is a list of the default ports the Data Collector will use; other ports can be used if needed or applicable.
Protocol |
Port |
Credential Requirements |
|---|---|---|
SNMP traps |
162 |
Not required |
AssetTracker Gen1 |
4242 |
Not required |
AssetTracker Gen2/MQTT |
1883 |
Username & Password |
Firewall considerations
Firewalls can interfere with Data Collector communication. We recommend that you test connectivity for the protocols and features you use. The asset discovery report can provide information that may be helpful in troubleshooting connectivity issues.
Downloading the Data Collector
Log in to your Hyperview instance as an Administrator.
Go to Discoveries → Data Collectors → Download Data Collector.
Select the Operating System. If you select Linux (AMD64) or Linux (RPI ARM64), download and SHA256 checksum links will appear, which you can use directly from your terminal.
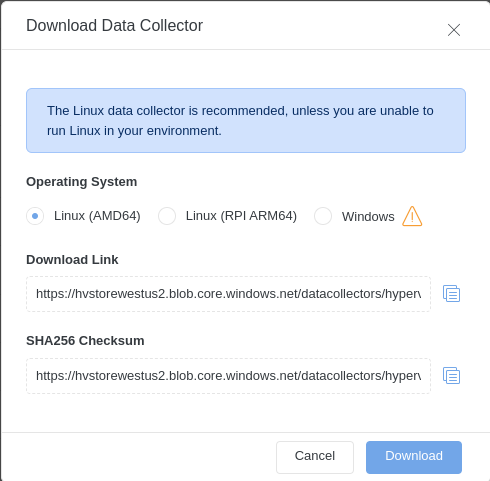
Click Download or use the
wgetLinux command to download the file.
Note
Please download the Data Collector version relevant to your CPU architecture. The Linux (AMD64) Data Collector is intended for Intel and AMD CPU-based systems. Linux (RPI ARM64) Data Collector is for Raspberry Pi systems.
A compressed Data Collector setup package will be downloaded to your browser’s default download location. The filename will resemble “linuxDataCollector-9999.tgz”, where “9999” represents the version number.
(Optional) Download the SHA256SUM file using wget and then use the
sha256sum -c <filename>command to verify file integrity. If you are on Windows, then PowerShellGet-FileHash -Algorithm SHA256 <filename>command will give you the hash of the downloaded file and you can then do manual verification by comparing the downloaded hash file with the result of the command.
Installing the Data Collector
Extract the downloaded Data Collector tar file to a local folder.
Run the install script as root or via sudo (
install-dc.sh).
sudo ./install-dc.sh
Tip
If you would like to skip hardware tests, e.g. for testing purposes, you can run the installer or the updater scripts with the SKIP_TESTS environment variable set to YES.
sudo SKIP_TESTS=YES ./install-dc.sh
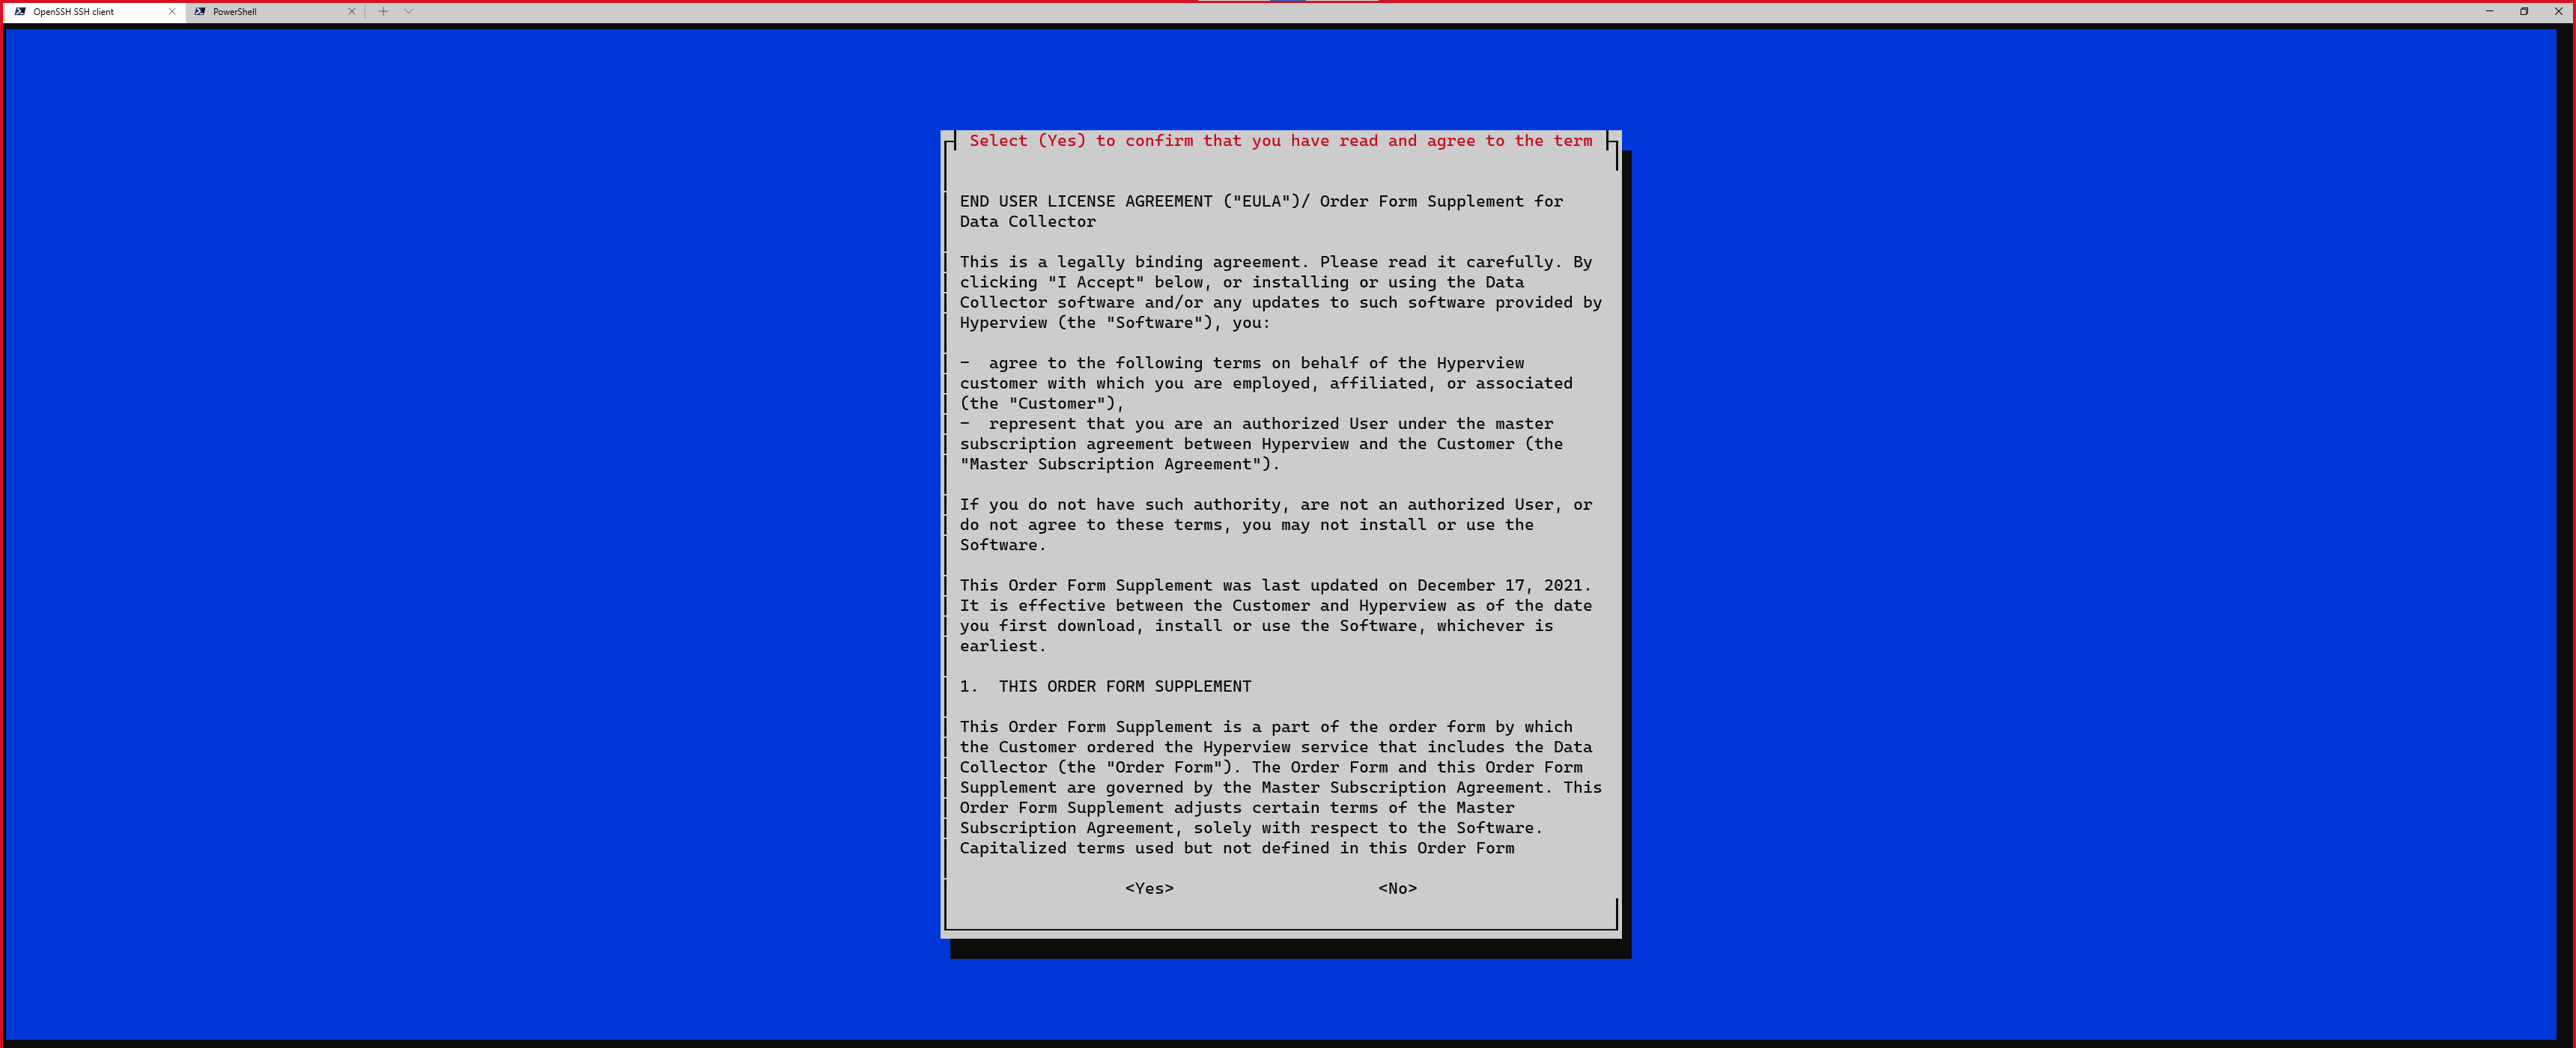
Accept the EULA by selecting Yes.
Proceed to register the Data Collector.
Registering Data Collectors
Once you have installed the Data Collector, you need to register it with Hyperview using a unique registration token. The Data Collector Configuration Tool (which registers the Data Collector) is automatically triggered during the Data Collector installation. Once the Data Collector is registered, it will be listed in the Data Collectors grid (Discoveries → Data Collectors).
Getting a registration token
Log in to your Hyperview instance as an Administrator.
Go to Discoveries → Data Collectors → Add. The “Add Data Collector” modal will open.
Click the copy icon to copy the registration token.
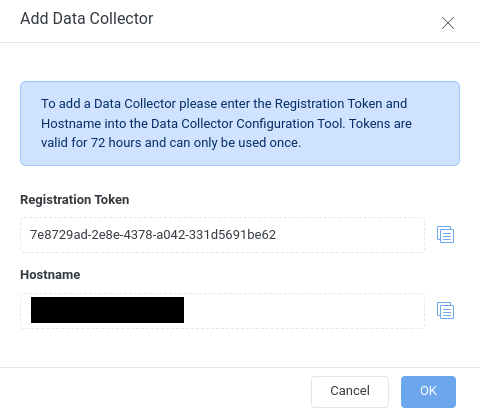
Click OK to close the modal.
Registering a Data Collector (for both AMD64 and RPI ARM64)
Tip
You can also run the Linux Data Collector Configuration Tool from /opt/datacollector/bin.
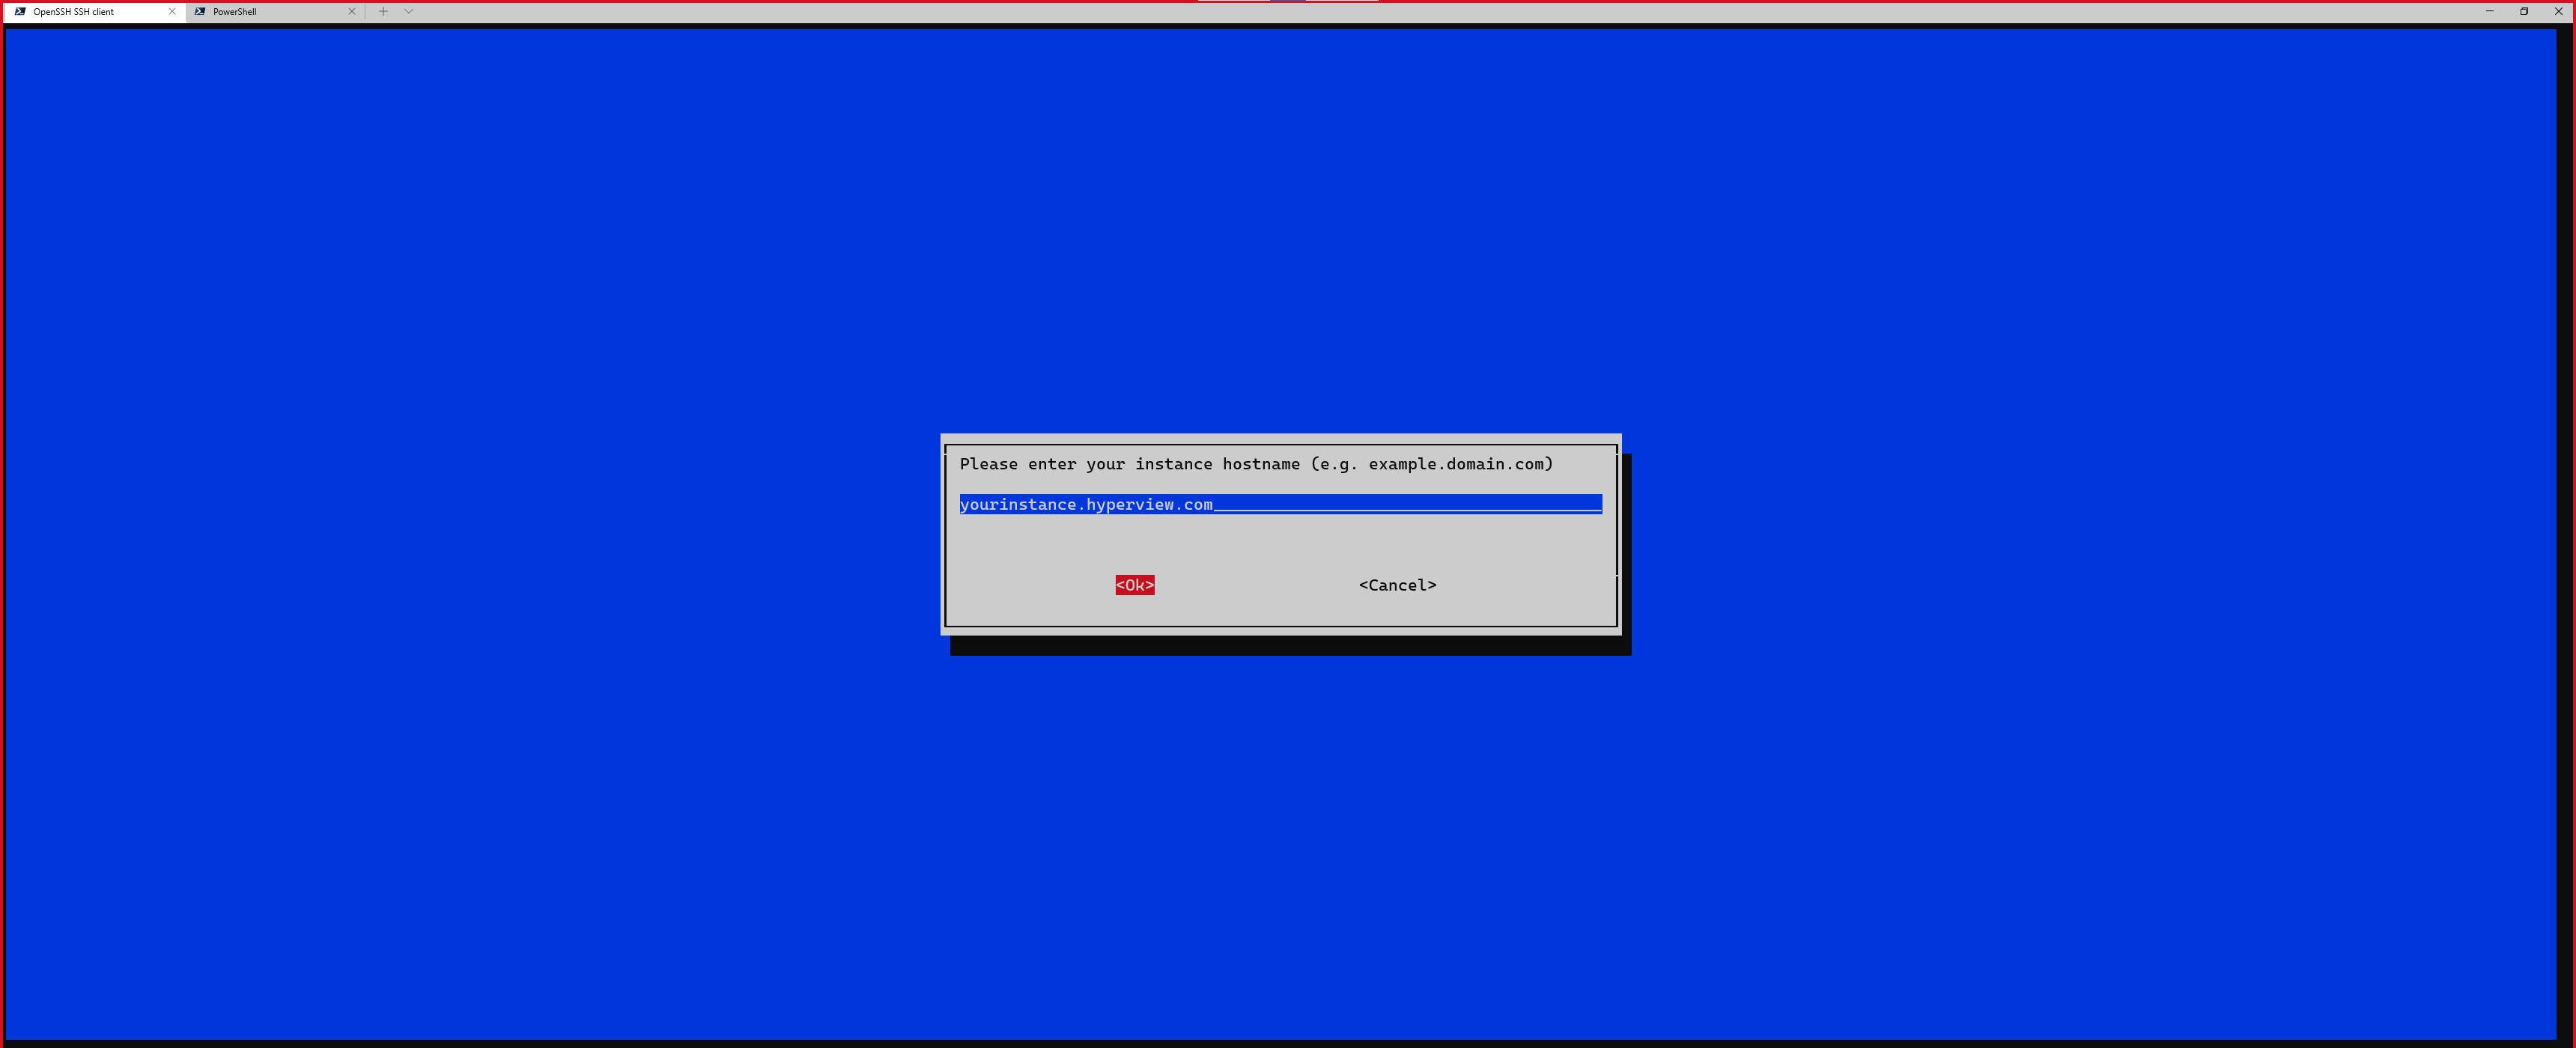
Enter the registration token.
Enter your API hostname (for example, “yourinstance.hyperviewhq.com”).
Enter the API Port Number, or leave it at default (443).
Select the protocol (HTTPS or HTTP), or leave it at default (HTTPS).
(Optional) Enter proxy details.
The Data Collector will be registered.
Verifying your Data Collector setup
Verify that Docker containers with the following names are running using docker ps:
dc-docker-stack-assettracker-service-1
dc-docker-stack-discovery-service-1
dc-docker-stack-monitoring-service-1
dc-docker-stack-mqtt-broker-1
dc-docker-stack-mqtt-service-1
dc-docker-stack-snmptrapreceiver-service-1
Next verify the last communicated timestamp in your Hyperview instance Discoveries -> Data Collectors list. It should update approximately every 30 seconds. You can use the refresh button to update the data in the table.
Reinstalling or uninstalling Data Collectors
The Data Collector core software runs as a set of Docker containers. In addition to those, configuration files,
some troubleshooting tools, logs and temporary files are all kept in /opt/datacollector.
To reinstall the Data Collector software, uninstall it first then install it.
Uninstall
Shutdown the docker containers
cd /opt/datacollector/dc-docker-stack/
docker compose down
Backup or rename the
/opt/datacollectordirectory If neededDelete the
/opt/datacollectordirectory
Once the uninstallation is done, perform a re-installation following the standard instructions.