Custom sensors
A custom sensor is a numeric sensor whose value is calculated from a formula that uses other sensors as inputs. For example, you can create a custom sensor that averages several temperature sensors, or that calculates the difference between a return temperature sensor and a supply temperature sensor.
Each custom sensor belongs to a source asset. Once created, it appears on the source asset’s Sensors page (Sensors) under the Custom Sensors category, and can be graphed and linked like other sensors. See Managing sensors for more information.
Assuming you have access privileges, you can manage all custom sensors from the Custom Sensors page (Assets → Custom Sensors).
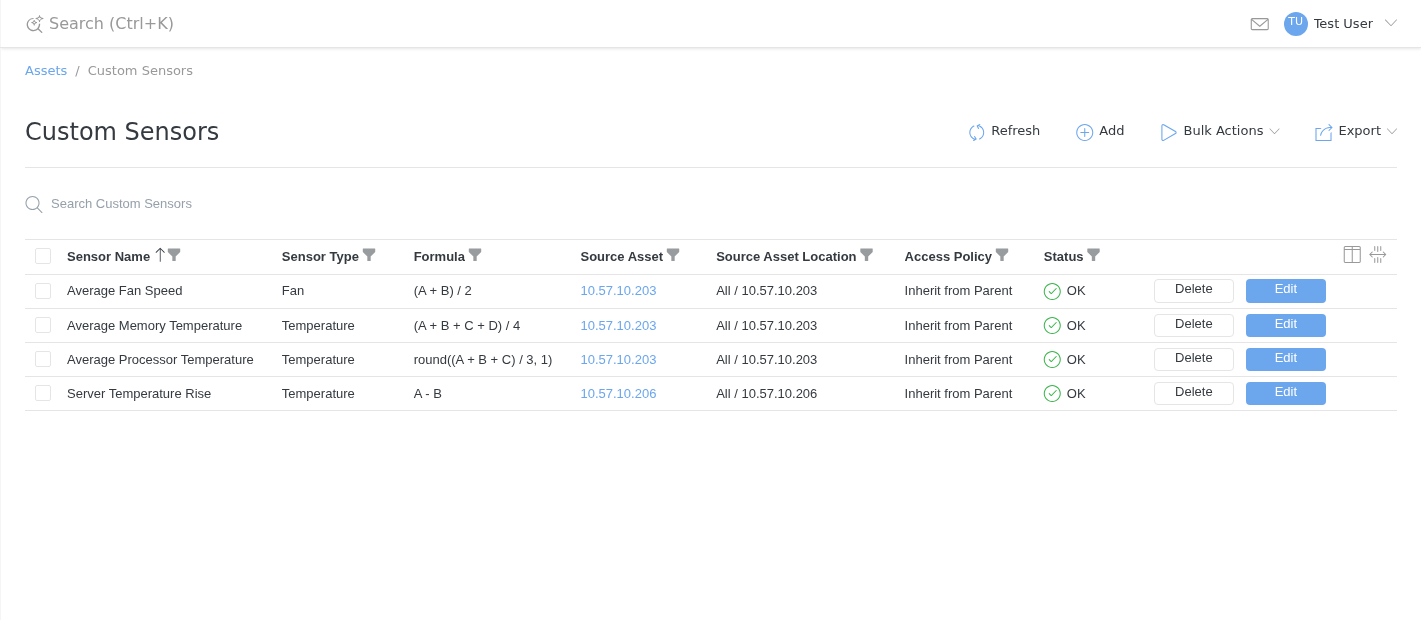
The Custom Sensors page
The Custom Sensors grid lists the following information for each custom sensor:
Sensor ID: the unique sensor ID. This column is hidden by default.
Sensor Name: the name of the custom sensor
Sensor Type: the sensor type, such as Temperature or Power
Formula: the formula used to calculate the sensor value, such as
A - BSource Asset: the asset that the custom sensor belongs to (click the asset name to open it)
Source Asset Location: the location of the source asset
Access Policy: the access policy applied to the custom sensor
Status: the status of the custom sensor
Use the search box to find custom sensors, and the column filters to narrow down the list.
Adding a custom sensor
You can add a custom sensor from either of the following places:
The Custom Sensors page (Assets → Custom Sensors): click Add.
An asset’s Sensors page: click Add Custom Sensor. The asset is used as the source asset, so the Source Asset field is not shown.
To add a custom sensor:
Select the Source Asset (only shown when adding from the Custom Sensors page).
Select a Type. Only numeric sensor types that apply to the source asset are available. The calculated value is displayed using the unit of the selected type.
Enter a Name for the custom sensor.
Define the formula using one of the following tabs (described in the sections below):
Simple: apply a common operation, such as Average or Sum, to sensors on the source asset.
Advanced: write your own formula using sensors from one or more assets.
Import: paste a formula that references sensors by asset ID and sensor name.
Click Test Formula to evaluate the formula against current sensor values. The Result is displayed below the formula.
Select an Access Policy as needed (the default is “Inherit from Parent”).
Click Add.
The custom sensor will be listed in the Custom Sensors grid.
Note
Each sensor used in a formula is assigned a variable letter (A, B, C, and so on) in the order it is selected. The variable mapping, including each sensor’s current value, is shown below the formula.
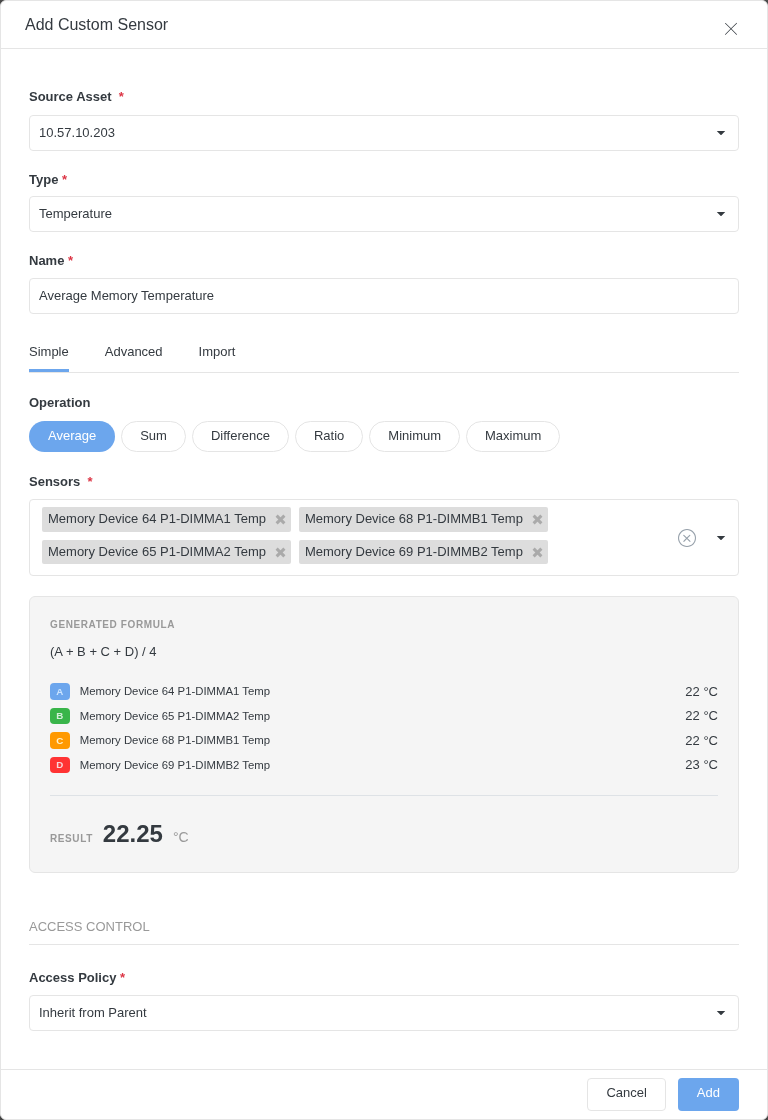
Simple
Use the Simple tab to apply one of the following operations to sensors on the source asset:
Operation |
Generated formula (two sensors) |
|---|---|
Average |
|
Sum |
|
Difference |
|
Ratio |
|
Minimum |
|
Maximum |
|
Select an Operation.
Select the Sensors to use. You can filter the sensor list by Name, Type, and Value.
The Generated Formula is shown below the sensor list.
Advanced
Use the Advanced tab to write your own formula, optionally using sensors from more than one asset.
Select the Sensors to use from the source asset.
To use sensors from another asset, click Add Asset Source, select the asset, and then select its sensors. Repeat as needed.
Enter the Formula using the variable letters shown in the variable mapping. You can use the following functions (click a function button to insert it):
if()abs()round()min()max()sqrt()pow()log()
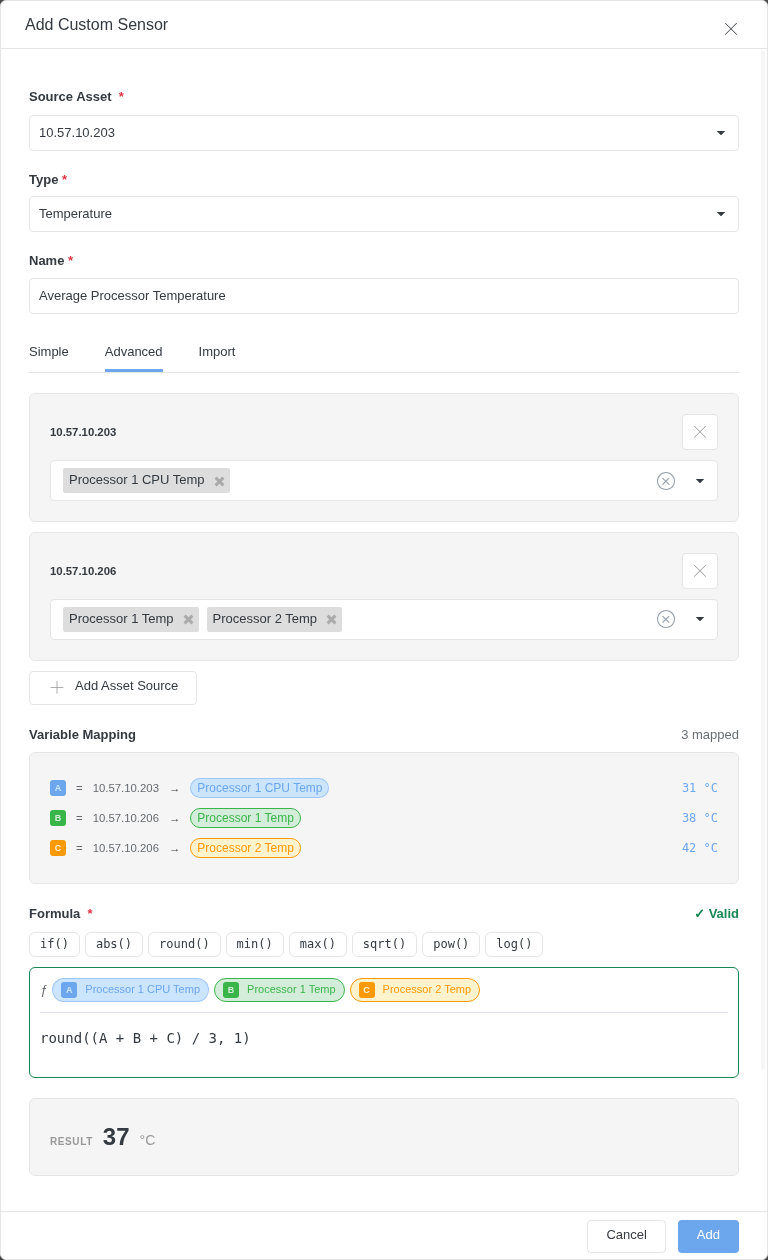
For example, the following formula averages a processor temperature sensor on the source asset (A) with two processor temperature sensors on another asset (B and C), rounded to one decimal place:
round((A + B + C) / 3, 1)
Note
If the formula cannot be evaluated (for example, because it uses a variable that is not mapped to a sensor), Test Formula displays “Evaluation failed”.
Import
Use the Import tab to paste an existing formula. Sensors are referenced using [(assetId).(sensorName)] syntax, where (0) refers to the source asset. For example:
[(0).(Return Temperature)] - [(0).(Supply Temperature)]
Paste the Formula.
Review the Sensor Mapping:
Sensors on the source asset (
(0)) are automatically matched by name where possible. Click the Edit button next to a sensor to change it.For each other asset ID, click the button to select the corresponding Hyperview asset. Once the asset is selected, its sensors are automatically matched by name where possible. Select the matching sensor for each reference that was not matched.
Once all references are mapped, the Rewritten Formula (using variable letters) is shown below the sensor mapping.
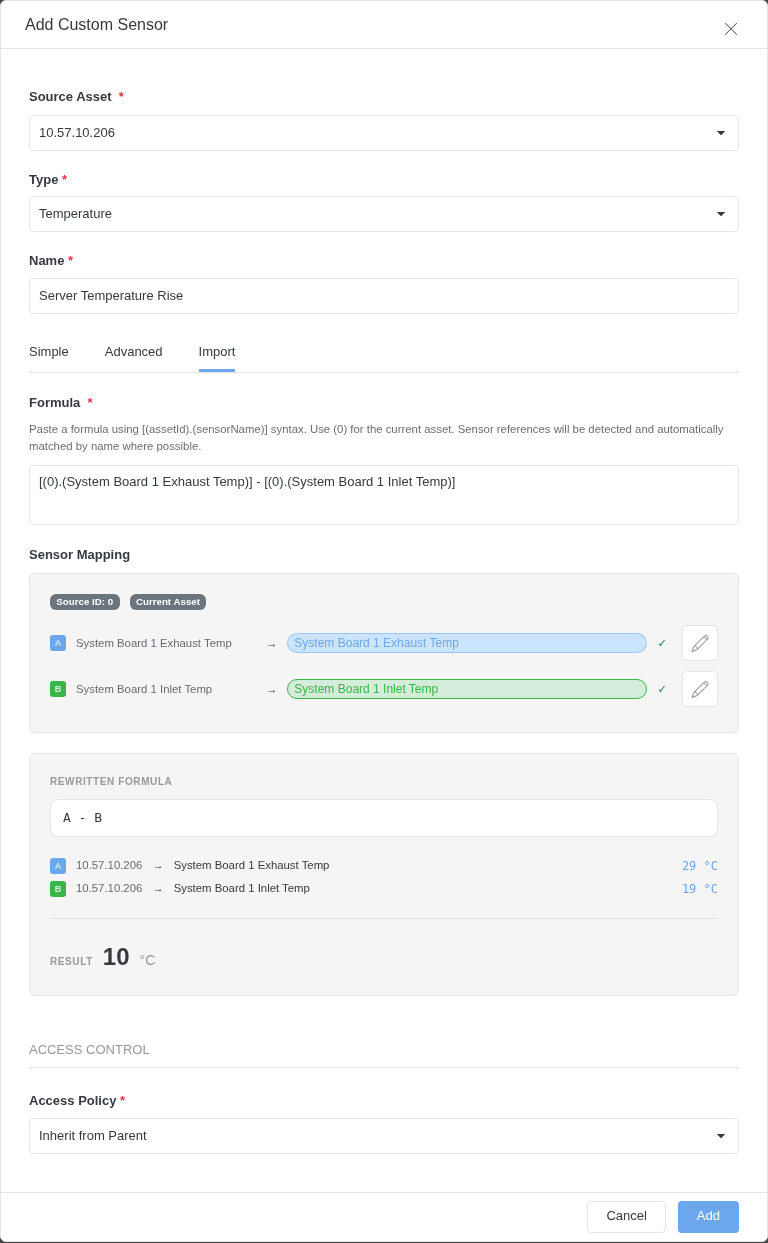
Example: importing a formula that uses multiple assets
The asset IDs in an imported formula do not need to be Hyperview asset IDs. Each ID other than (0) is a placeholder that you map to a Hyperview asset in the Sensor Mapping.
For example, the following formula calculates the difference between the highest exhaust temperature and the lowest inlet temperature across three servers: the source asset ((0)) and two other servers ((1) and (2)):
max([(0).(Exhaust Temp)], [(1).(Exhaust Temp)], [(2).(Exhaust Temp)]) - min([(0).(Inlet Temp)], [(1).(Inlet Temp)], [(2).(Inlet Temp)])
To import this formula:
Select the first server as the Source Asset, select “Temperature” as the Type, and enter a Name.
On the Import tab, paste the Formula. The Sensor Mapping shows one section for each asset ID in the formula:
Source ID: 0 is labelled Current Asset. Its Exhaust Temp and Inlet Temp references are matched to the source asset’s sensors with the same names.
Source ID: 1 and Source ID: 2 each show a “Select the Hyperview asset that corresponds to source ID” button.
Click the button for Source ID: 1 and select the second server. If the server has sensors named Exhaust Temp and Inlet Temp, they are matched automatically. Otherwise, select the corresponding sensor for each reference (for example, a sensor named “System Board 1 Exhaust Temp”).
Repeat the previous step for Source ID: 2, selecting the third server.
Review the Rewritten Formula. Variable letters are assigned to the references one asset ID at a time, so the formula above is rewritten as:
max(A, C, E) - min(B, D, F)
The variable mapping below the formula lists the asset, sensor, and current value for each variable.
Click Test Formula to verify the Result, and then click Add.
Note
Sensor names in the pasted formula only need to match the Hyperview sensor names for automatic matching. A reference can be mapped to a sensor with a different name.
To map an asset ID to a different asset, click Change and select the asset again.
Finish editing the formula before mapping assets. Changing the formula can clear the assets that were selected for the other asset IDs.
Editing a custom sensor
Click the Edit button for the custom sensor in the Custom Sensors grid.
Update the custom sensor as needed. Note that the Source Asset cannot be changed.
Click Save.
Deleting custom sensors
To delete a custom sensor:
Click the Delete button for the custom sensor in the Custom Sensors grid.
Click Delete to confirm.
To delete multiple custom sensors, select them in the grid and use Bulk Actions → Delete.
Updating access policies
You can update the access policy of multiple custom sensors at once:
Select the custom sensors in the Custom Sensors grid.
Click Bulk Actions and select one of the following:
Update Access Policy: applies the selected access policy to the custom sensors.
Reset Access Policy: resets the custom sensors’ access policy to the default “inherit from parent”.
Exporting and importing custom sensors
The Export menu on the Custom Sensors page has the following options:
Export Grid: exports the Custom Sensors grid.
Export for Import: exports custom sensors as a CSV file in the format used for bulk importing custom sensors.
To bulk import custom sensors:
Go to Assets → Import → Download Template File → Custom Sensors. A CSV template for bulk importing custom sensors will be downloaded to your browser’s default download directory.
Update the file for the custom sensors that you wish to import. Available columns are:
Column |
Description |
|---|---|
Sensor ID |
The custom sensor ID. Leave blank to add a new custom sensor. Enter the ID of an existing custom sensor to update it. |
Sensor Name |
The name of the custom sensor |
Sensor Type |
The sensor type, such as Temperature |
Formula |
The formula, using variable letters (for example, |
Source Asset ID |
The ID of the source asset |
Access Policy |
The access policy name, or “Inherit from Parent” |
Variable A Sensor ID, Variable B Sensor ID, … |
The ID of the sensor mapped to each variable in the formula. Add one column for each variable used. The sensors can belong to the source asset or to other assets. |
Save the updated file.
On the Import page (Assets → Import), click Select Location and File. Select the “Custom Sensors” template, and then select or drag the updated CSV file to upload. A location is not needed, because the Source Asset ID column sets the asset for each custom sensor.
Click Select. Once the file is uploaded, verify the list of custom sensors. The Action column shows “Create” for rows without a Sensor ID and “Update” for rows with a Sensor ID. Troubleshoot, update, and re-upload the file as needed.
Click Import.
Check the Result and Message columns for each row. You can click Export Results to download the results, including any error messages.
Finding the IDs to use in the file
Sensor ID (of an existing custom sensor): on the Custom Sensors page, click Export → Export for Import. The exported file contains the ID, formula, and variable sensor IDs of each custom sensor, and can be edited and re-imported to update the custom sensors.
Variable sensor IDs: on the asset’s Sensors page, switch to List View, open the Column Selector, and select the “ID” column.
Source Asset ID: the asset ID is shown in the browser address bar when the asset is open.
Example: importing custom sensors from a CSV file
The following example data adds one custom sensor and updates another:
Sensor ID |
Sensor Name |
Sensor Type |
Formula |
Source Asset ID |
Access Policy |
Variable A Sensor ID |
Variable B Sensor ID |
Variable C Sensor ID |
|---|---|---|---|---|---|---|---|---|
Hottest Server Temperature Rise |
Temperature |
|
2b9658cc-646a-440b-99b8-6876620427c0 |
Inherit from Parent |
019f19d7-da3e-74ee-acc7-d493385da468 |
019f19d7-d887-7465-839d-f5d44f1181ba |
019f19d7-d887-7170-aa73-d86d55e2cb2d |
|
01a11cc9-103d-71bd-81de-f77080a58554 |
Average Server Temperature |
Temperature |
|
2b9658cc-646a-440b-99b8-6876620427c0 |
Inherit from Parent |
019f19d7-da3e-74ee-acc7-d493385da468 |
019f19d7-d887-7465-839d-f5d44f1181ba |
019f19d7-d887-7170-aa73-d86d55e2cb2d |
In the CSV file, the formulas must be enclosed in double quotes because they contain commas (for example, "max(A, B) - C").
The first row has no Sensor ID, so a new custom sensor is created on the source asset. Variable A is a sensor on the source asset, and variables B and C are sensors on a different asset.
The second row has the Sensor ID of an existing custom sensor, so that custom sensor is updated with the name, formula, and variable sensors in the row.
Note
The IDs above are examples only. Replace them with the IDs from your own Hyperview instance.
Troubleshooting import errors
If a row cannot be imported, its Result is “Error” and the reason is shown in the Message column. Other rows in the file are still imported.
Message |
Cause |
|---|---|
Variable ‘B’ in formula is not defined in sensor mappings. |
The formula uses a variable that does not have a sensor ID in the corresponding Variable Sensor ID column. |
Sensor does not exist. |
A Variable Sensor ID does not match a sensor in Hyperview. |
Failed to create custom sensor. |
The row could not be saved. Check that the Sensor Type is a valid sensor type and that the Source Asset ID matches an asset in Hyperview. |
Note
If the Access Policy does not match the name of an access policy, the custom sensor is imported with the “Inherit from Parent” access policy.
See Adding assets for more information on bulk importing.